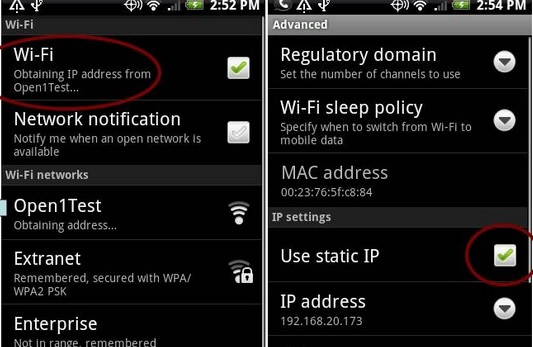
Obtaining IP Address is a very irritating problem that you may find in any android or smartphone. This is a message that is reflected while you try to connect your android phone to Wi-Fi. Our device tries to find the closest connection always. Now when the Wi-Fi is turned on, the device starts scanning and tries obtaining IP address from the network. The problem occurs while the Wi-Fi can’t provide an IP address to the device resulting in the disconnection and scanning happens again to find out the network. This is the main reason of obtaining IP address error.

Ways to solve obtaining IP address error in Android
There are two ways that can guide you to fix obtaining IP address error in Android-WiFi problem.
- First you can download some apps that are easily available in Google play store to configure your phone. Give a search for Wi-Fi fix and you will be flooded with lots of apps. WiFix by mHotspot is a very helpful application that can help you to fix this issue.
- The second option is very helpful where you need to select a static IP to differentiate it from other connected devices. To set static IP you need to follow the following steps. This process differs with the version.
For Android 2.x to 4.0
- Head into settings to select wireless and Network.
- Turn on Wi-Fi then go to Wi-Fi settings
- Press Menu key and select Advance
- Tap Use static IP and you have to put IP address, gateway, DNS1, DNS2 and Netmask. Now to assign an IP address you may have to contact to your wireless network service provider or you can put the IP address according to your screenshot. You can decide the IP address.
For Android 4.1 and higher version
- Go to settings
- Turn on W-Fi to connect to a network
- Press and hold the connected network to select Modify network
- Advance option will be coming next from where you have to go to IP settings
- Select static and put a value of your choice but no need to change any other things.
So these are the process to fix obtaining IP address Error in Android-Wifi problem.
Leave a Reply